CloudFormation is an AWS resource that allows you to build and rebuild your infrastructure within AWS without having to perform manual actions or writing custom scripts. This is a great benefit as it allows you to create a stack across multiple regions without having to manually create the resources across each region.
In my current role I do quite a bit of testing between AWS resources and resources located on On-Premise networks. I often need to connect resources in multiple regional VPCs to resources On-Prem. In this example I will show you how to create a repeatable CloudFormation stack that will create the underlying resources needed for a VPN connection, as well as a test EC2 instance within the VPC used to test connectivity between AWS and On-Prem.
For my use case I want to be able to create VPN connections quickly and repeatably with as few changes to the source file as possible. In this scenario I will create a VPN connection in the us-west-2 region, test connectivity from AWS to On-Prem. Then create a VPN connection in the us-east-2 region and test connectivity using the same CloudFormation template. In this scenario my end-point device is a Sophos UTM firewall.
Dissecting the source file
In order to understand what the stack is doing we will need to understand the values in the source file and what they do. I have written this in YAML as I find it easier to read.
Here is the source file:
https://s3.amazonaws.com/resetenv.com-data/2018/05/09/cf/sophos3.yaml
The AWSTemplateFormatVersion identifies the capabilities of the template. The latest format version is 2010-09-09 and is currently the only valid value. Parameters are very useful in that they enable you to input custom values to your template each time you create a stack or update it. So by referencing values in the Parameters section. I am able to populate parameters based on those values such as the VpcCIDR range.
So for example when I create the stack in the us-west-2 region I can specify the VpcCIDR as 192.168.0.0/16, carve out a subnet using 192.168.2.0/24. I can then populate the same parameter when creating the stack in the us-east-2 region using a different VpcCIDR 10.10.0.0/16 and a subnet of 10.10.2.0/24. The great thing here is that I don’t have to change the source file in any way when I use parameters. I can simply pass values to those parameters via the CLI during the stack-create. Or type them in if I’m launching the stack via the Console. I will show exactly how farther down below.
AWSTemplateFormatVersion: “2010-09-09”
Description: CF Template to build VPN to Sophos UTM + test instance
Parameters:
  KeyName:
    Description: “Keypair for SSH”
    Type: “AWS::EC2::KeyPair::KeyName” #Will search for KeyPair specific to Region

InstanceType:
    Description: “Possible instance types”
    Type: String
    Default: “t2.micro”
    AllowedValues:
     - t2.micro
     - t2.small
     - t2.medium
     - t2.large

VpcCIDR:
    Description: “The CIDR block for the VPC”
    Type: “String”
    AllowedPattern: “(\d{1,3})\.(\d{1,3})\.(\d{1,3})\.(\d{1,3})/(\d{1,2})”
    Default: “192.168.0.0/16”

SubnetCIDR:
    Description: “CIDR for public subnet”
    Type: “String”
    AllowedPattern: “(\d{1,3})\.(\d{1,3})\.(\d{1,3})\.(\d{1,3})/(\d{1,2})”
    Default: “192.168.2.0/24”
References
https://docs.aws.amazon.com/AWSCloudFormation/latest/UserGuide/template-formats.html
https://docs.aws.amazon.com/AWSCloudFormation/latest/UserGuide/parameters-section-structure.html
In this snippet we start to define the Resources. These are the actual resources that you want to include in the stack. This particular one will create my VPC CIDR block. I can use the Ref command to return the value of the specified parameter or resource. In this case I will reference VpcCIDR from the above parameters. Based on the regex in the allowed pattern I can create an IPv4 block such as 10.10.0.0/16. If I do not specify anything it will default to 192.168.0.0/16. Lastly I have Tagged it so I can easily see the new VPC that is created.
Resources:
  vpnVPC:
    Type: “AWS::EC2::VPC”
    Properties:
      CidrBlock: !Ref VpcCIDR
      EnableDnsSupport: true
      EnableDnsHostnames: true

      Tags:
       - Key: Name
         Value: “Sophos VPN VPC”
References
https://docs.aws.amazon.com/AWSCloudFormation/latest/UserGuide/aws-resource-ec2-vpc.html
https://docs.aws.amazon.com/AWSCloudFormation/latest/UserGuide/intrinsic-function-reference-ref.html
The next snippet I define is the subnet to carve out within the new VPC. Here I reference the vpnVPC resource as well as the SubnetCIDR from the parameters above. This has the same regex as the VpcCIDR so I am able to specify the range I want during the stack creation. It will also default to 192.168.2.0/24 if I do not specify a range. I will also use the MapPublicIpOnLaunch property which will do exactly that. It indicates whether instances launched in this subnet receive a public IP address. In this case I want this to be true. This way I can SSH to the public IP of the instance if needed.
I can also use the Ref command to get return values instead of hard coding them. For some resources, an identifer is returned that has another significant meaning in the context of the resource. In this example an AWS::EC2::VPC will return the VPC ID which will be vpc-0aca0fefad6f961e1.
  subnet:
    Type: “AWS::EC2::Subnet”
    Properties:
     VpcId: !Ref vpnVPC
     CidrBlock: !Ref SubnetCIDR
     MapPublicIpOnLaunch: true
     Tags:
      - Key: Name
        Value: “Sophos VPN Subnet”
References
https://docs.aws.amazon.com/AWSCloudFormation/latest/UserGuide/aws-resource-ec2-subnet.html#aws-resource-ec2-subnet-properties
In this snippet I declare the properties used in my CustomerGateway or my On-Premise endpoint device. I have hard coded the IpAddress as currently I only have one public IP to utilize at my On-Prem location. I tag it again so its easily findable.
  SophosCGW:
    Type: “AWS::EC2::CustomerGateway”
    Properties:
      BgpAsn: 65000
      IpAddress: 76.222.222.205
      Type: “ipsec.1”
      Tags:
       - Key: Name
         Value: “Sophos CGW”
References
https://docs.aws.amazon.com/AWSCloudFormation/latest/UserGuide/aws-resource-ec2-customer-gateway.html
This snippet defines the AWS side of the VPN connection. This is basically the VPC-side endpoint and is required for the VPN connection setup.
  AWSvpnGW:
    Type: “AWS::EC2::VPNGateway”
    Properties:
      Type: “ipsec.1”
      Tags:
       - Key: Name
         Value: “AWS to Sophos”
References
https://docs.aws.amazon.com/AWSCloudFormation/latest/UserGuide/aws-resource-ec2-vpn-gateway.html
In this block I am attaching the actual Gateway to the VPC that is created. By default when a Virtual Private Gateway is created it is not automatically attached to a VPC.
  VPCattach:
    Type: “AWS::EC2::VPCGatewayAttachment”
    Properties:
      VpcId: !Ref vpnVPC
      VpnGatewayId: !Ref AWSvpnGW
References
https://docs.aws.amazon.com/AWSCloudFormation/latest/UserGuide/aws-resource-ec2-vpc-gateway-attachment.html
This snippet will create the VPN connection between the virtual private gateway and my customer gateway device. In this case my Sophos UTM.
  VPNConnection:
    Type: “AWS::EC2::VPNConnection”
    Properties:
      Type: “ipsec.1”
      CustomerGatewayId: !Ref SophosCGW

      VpnGatewayId: !Ref AWSvpnGW
      Tags:
       - Key: Name
         Value: “AWS to Sophos”
References
https://docs.aws.amazon.com/AWSCloudFormation/latest/UserGuide/aws-resource-ec2-vpn-connection.html
Here I start to define the resources that will be associated with the test EC2 instance. In this case the SecurityGroup. I am allowing inbound to port 22 from anywhere so I can log into the instance to be able to test from it. I then lock down ICMP to the CIDR range of my On-Prem network.
  SecurityGroup:
    Type: “AWS::EC2::SecurityGroup”
    Properties:
      GroupDescription: “SG for Testing instance”
      VpcId: !Ref vpnVPC
      SecurityGroupIngress:
      -
        CidrIp: 0.0.0.0/0
        FromPort: 22
        IpProtocol: tcp
        ToPort: 22
      -
        CidrIp: 172.16.2.0/24
        FromPort: 8
        ToPort: -1
        IpProtocol: icmp
      Tags:
        - Key: Name
          Value: “VPNsg”
References
https://docs.aws.amazon.com/AWSCloudFormation/latest/UserGuide/aws-properties-ec2-security-group.html
Here I am creating an IGW that will be attached to my VPC. Any traffic not destined for my On-Prem network will be routed out the IGW.
  IGW:
    Type: “AWS::EC2::InternetGateway”
    Properties:
      Tags:
        - Key: Name
          Value: “vpn”
References
https://docs.aws.amazon.com/AWSCloudFormation/latest/UserGuide/aws-resource-ec2-internetgateway.html
Here the IGW is getting attached to the VPC
  VPCgwAttach:
    Type: “AWS::EC2::VPCGatewayAttachment”
    Properties:
      InternetGatewayId: !Ref IGW
      VpcId: !Ref vpnVPC
References
https://docs.aws.amazon.com/AWSCloudFormation/latest/UserGuide/aws-resource-ec2-vpc-gateway-attachment.html
This snippet will create the new routing table within the VPC.
  VPNec2Route:
    Type: “AWS::EC2::RouteTable”
    Properties:
      VpcId: !Ref vpnVPC
References
https://docs.aws.amazon.com/AWSCloudFormation/latest/UserGuide/aws-resource-ec2-route-table.html
This block will create the route within the routing table that was created above. In this case I’m routing everything 0.0.0.0/0 out the IGW that was created. This is the first resource where I will use the DependsOn attribute. Here I can specify that the creation of a specific resource follows another. So in this case I do not want the Route to be created until after the Gateway is attached to the VPC otherwise I will get errors in the stack.
  VPNrouteOut:
    Type: “AWS::EC2::Route”
    DependsOn: IGW
    Properties:
      DestinationCidrBlock: 0.0.0.0/0
      GatewayId: !Ref IGW
      RouteTableId: !Ref VPNec2Route
    DependsOn: VPCattach
References
https://docs.aws.amazon.com/AWSCloudFormation/latest/UserGuide/aws-resource-ec2-route.html
https://docs.aws.amazon.com/AWSCloudFormation/latest/UserGuide/aws-attribute-dependson.html
This snippet will associate the created subnet with the route table. By default when a VPC is created it will create a routing table automatically and it is set by default for all of its subnets. So in order to get around this I can do a SubnetRouteTableAssociation which will then allow me to associate the newly created route table with our VPC instead of the default one.
  SubnetRouteAssociate:
    Type: “AWS::EC2::SubnetRouteTableAssociation”
    Properties:
      RouteTableId: !Ref VPNec2Route
      SubnetId: !Ref subnet
References
https://docs.aws.amazon.com/AWSCloudFormation/latest/UserGuide/aws-resource-ec2-subnet-route-table-assoc.html
This resource will enable the routes from the On-Prem network to propagate into the routing table of the VPC. It will depend on the Gateway being attached to the VPC first.
  VPNrouteProp:
    Type: “AWS::EC2::VPNGatewayRoutePropagation”
    Properties:
      RouteTableIds:
        - !Ref VPNec2Route
      VpnGatewayId: !Ref AWSvpnGW
    DependsOn: VPCattach
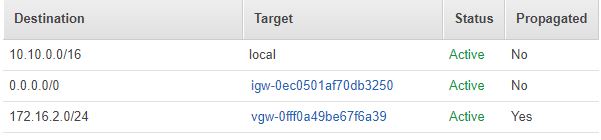
The routes being propagated will be pushed out via BGP from my On-Prem device. In the end it will look something like this in the VPC routing table. So essentially any traffic destined from the VPC to 172.16.2.0/24 will travel over the VPN. Everything else will be routed out the IGW.
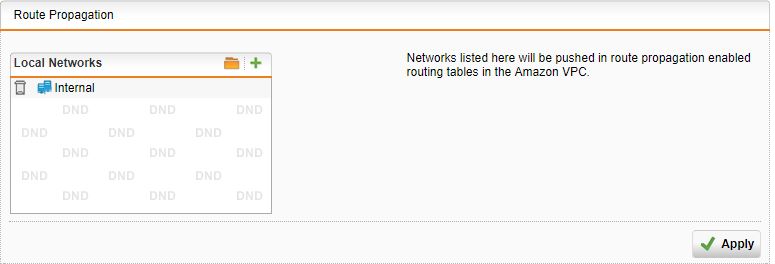
From the Sophos perspective the route propagation is defined in by logging into the UTM going to Site-to-site VPN -> Amazon VPC -> Setup -> Route Propagation.
References
https://docs.aws.amazon.com/AWSCloudFormation/latest/UserGuide/aws-resource-ec2-vpn-gatewayrouteprop.html
https://community.sophos.com/kb/en-us/120922
Finally my test instance is created within the VPC. The ImageId field will reference whatever AMI exists within that region. So this will need to be updated in the source file before the stack is created in each region. So in this case this AMI resides in the us-west-2 region. Again I use the Ref command to reference the instance type and KeyName to use.
  TestInstance:
    Type: “AWS::EC2::Instance”
    Properties:
      ImageId: ami-d8be01a0
      InstanceType: !Ref InstanceType
      KeyName: !Ref KeyName
      SecurityGroupIds:
      -
        !Ref SecurityGroup
      SubnetId: !Ref subnet
      Tags:
        - Key: Name
          Value: “TestVPN”
References
https://docs.aws.amazon.com/AWSCloudFormation/latest/UserGuide/aws-properties-ec2-instance.html
Creating the stack
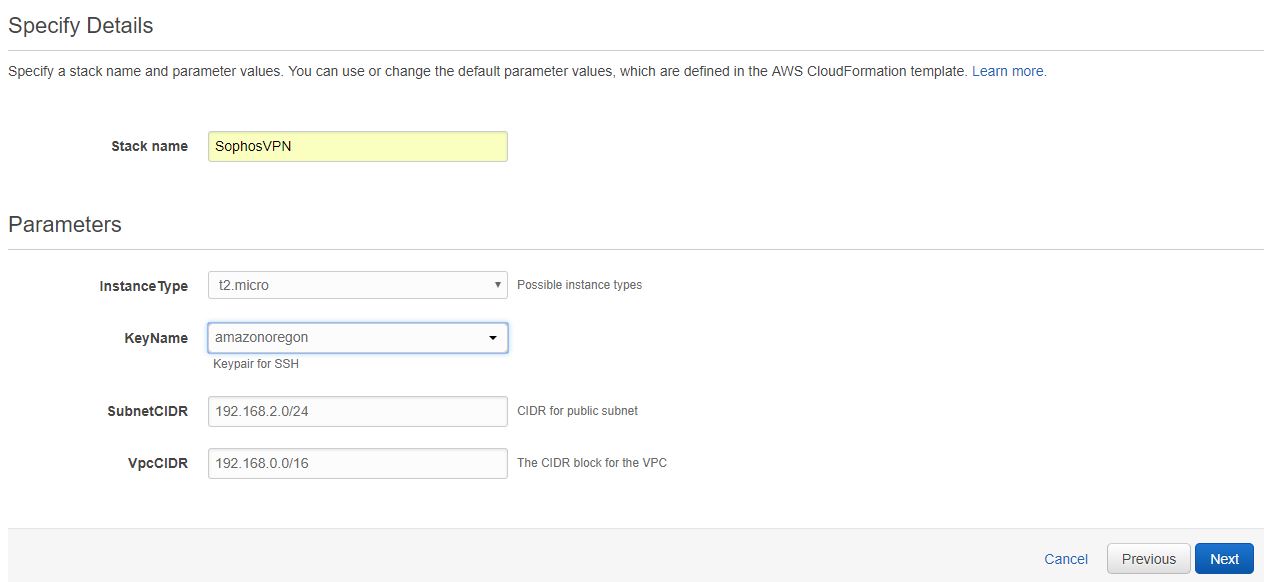
Now that we understand everything in the CloudFormation template we can create the stack. Here I’m using the CLI to run create-stack and passing the Parameters I mentioned above. Or this can be uploaded as a template into the CloudFormation dashboard to create the stack.
$ aws cloudformation create-stack –stack-name SophosVPN –template-body file:///home/evan/sophos3.yaml –parameters ParameterKey=InstanceType,ParameterValue=t2.micro ParameterKey=KeyName,ParameterValue=amazonoregon ParameterKey=VpcCIDR,ParameterValue=192.168.0.0/16 ParameterKey=SubnetCIDR,ParameterValue=192.168.2.0/24
{
    “StackId”: “arn:aws:cloudformation:us-west-2:179741345863:stack/SophosVPN/12932840-a490-11e8-843d-503ac9316861”
}
Console
After a few minutes we can verify the stack was created.
aws cloudformation describe-stacks –stack-name SophosVPN
{
    “Stacks”: [
        {
            “StackId”: “arn:aws:cloudformation:us-west-2:179741345863:stack/SophosVPN/12932840-a490-11e8-843d-503ac9316861”,
            “Description”: “CF Template to build VPN to Sophos UTM + test instance”,
            “Parameters”: [
                {
                    “ParameterValue”: “amazonoregon”,
                    “ParameterKey”: “KeyName”
                },
                {
                    “ParameterValue”: “192.168.2.0/24”,
                    “ParameterKey”: “SubnetCIDR”
                },
                {
                    “ParameterValue”: “192.168.0.0/16”,
                    “ParameterKey”: “VpcCIDR”
                },
                {
                    “ParameterValue”: “t2.micro”,
                    “ParameterKey”: “InstanceType”
                }
            ],
            “Tags”: [],
            “EnableTerminationProtection”: false,
            “CreationTime”: “2018-08-20T15:45:32.890Z”,
            “StackName”: “SophosVPN”,
            “NotificationARNs”: [],
            “StackStatus”: “CREATE_COMPLETE”,
            “DisableRollback”: false,
            “RollbackConfiguration”: {}
        }
    ]
}
Console

References
https://docs.aws.amazon.com/cli/latest/reference/cloudformation/create-stack.html
https://docs.aws.amazon.com/cli/latest/reference/cloudformation/describe-stacks.html
Sophos UTM configuration
Now that the stack is up and running. I can then log into my Sophos UTM device and finish the connection. I do this by logging into the UTM via its URL -> Site-to-site VPN -> Amazon VPC -> Setup -> Import Via Amazon Credentials. I have found that this is the easiest way. As it will pull down the configuration for you based on your access key and secret key. This will require an access key and secret key which can be configured in IAM or set up during the AWS CLI configuration.
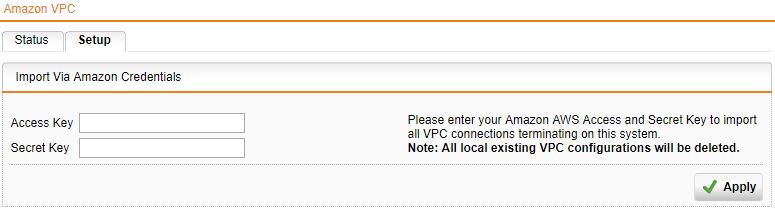
Once this is successful. You can click back on the Status tab to make sure the VPN tunnel is up.
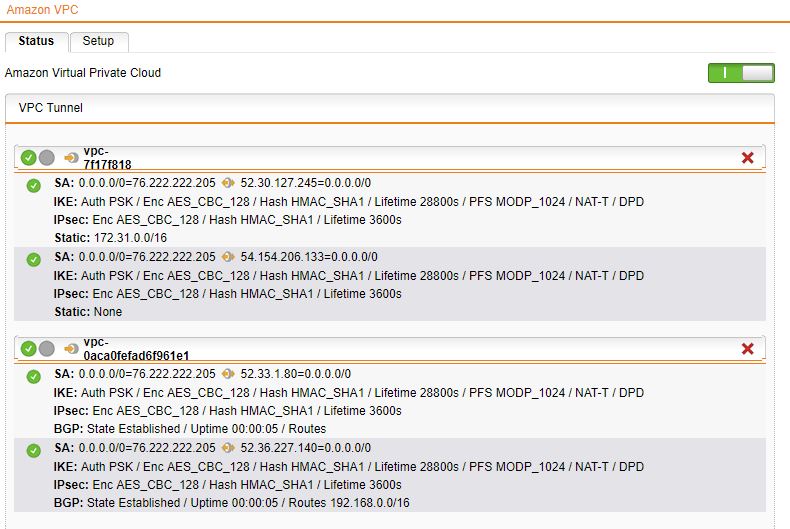
References
https://docs.aws.amazon.com/cli/latest/userguide/cli-chap-getting-started.html
https://docs.aws.amazon.com/IAM/latest/UserGuide/id_users_create.html
Testing connectivity
I can get the instance-id by looking in the CloudFormation stack-events and looking for the AWS::EC2::Instance event.
$ aws cloudformation describe-stack-events –stack-name SophosVPN | grep -A 5 AWS::EC2::Instance
            “ResourceType”: “AWS::EC2::Instance”,
            “Timestamp”: “2018-08-20T15:46:32.627Z”,
            “StackName”: “SophosVPN”,
            “ResourceProperties”: “{\“KeyName\”:\“amazonoregon\“,\“ImageId\”:\“ami-d8be01a0\“,\“SubnetId\”:\“subnet-0fa476c2283c969aa\“,\“InstanceType\”:\“t2.micro\“,\“SecurityGroupIds\”:[\“sg-0a10cccc56e8570a4\“],\“Tags\”:[{\“Value\”:\“TestVPN\“,\“Key\”:\“Name\“}]}”,
            “PhysicalResourceId”: “i-0cfb251541fdbc68d”,
            “LogicalResourceId”: “TestInstance”
In this case the instance-id is i-0cfb251541fdbc68d. I can then do a describe on that particular instance-id to get the PrivateIpAddress
$ aws ec2 describe-instances –instance-ids i-0cfb251541fdbc68d | grep PrivateIpAddress
                    “PrivateIpAddress”: “192.168.2.147”,
                            “PrivateIpAddresses”: [
                                    “PrivateIpAddress”: “192.168.2.147”,
                            “PrivateIpAddress”: “192.168.2.147”,
I will then test that I can ping this IP from a machine within my On-Prem LAN.
evan@pine64:~$ ping -c 3 192.168.2.147
PING 192.168.2.147 (192.168.2.147) 56(84) bytes of data.
64 bytes from 192.168.2.147: icmp_seq=1 ttl=253 time=78.3 ms
64 bytes from 192.168.2.147: icmp_seq=2 ttl=253 time=78.2 ms
64 bytes from 192.168.2.147: icmp_seq=3 ttl=253 time=78.7 ms

192.168.2.147 ping statistics
3 packets transmitted, 3 received, 0% packet loss, time 2003ms
rtt min/avg/max/mdev = 78.263⁄78.435⁄78.734⁄0.311 ms
Everything looks good so I should also be able to log into that instance and ping back to my On-Prem machine at 172.16.2.23.
[ec2-user@ip-192-168-2-147 ~]$ ping -c 3 172.16.2.23
PING 172.16.2.23 (172.16.2.23) 56(84) bytes of data.
64 bytes from 172.16.2.23: icmp_seq=1 ttl=63 time=1124 ms
64 bytes from 172.16.2.23: icmp_seq=2 ttl=63 time=886 ms
64 bytes from 172.16.2.23: icmp_seq=3 ttl=63 time=1669 ms

172.16.2.23 ping statistics
3 packets transmitted, 3 received, 0% packet loss, time 2011ms
rtt min/avg/max/mdev = 886.198⁄1226.982⁄1669.782⁄327.931 ms, pipe 2
References
https://docs.aws.amazon.com/cli/latest/reference/ec2/describe-instances.html
https://docs.aws.amazon.com/cli/latest/reference/cloudformation/describe-stack-events.html
Second VPN connection
Everything is properly setup for the first VPN tunnel and connectivity works. I can now set up the second VPN using the same CloudFormation template, change the AMI ID, and test connectivity. I will first look for the AMI id in that region using my account as the owner and grepping for ImageId. I will then update the TestInstance Resources snippet in my CloudFormation template with the new ImageId.
$ aws ec2 describe-images --owners 179741345863 --region us-east-2 | grep "ImageId"
            "ImageId": "ami-0e9c33d03cf57fad6",
Here I update the YAML file with the new AMI id.
  TestInstance:
    Type: "AWS::EC2::Instance"
    Properties:
      ImageId: ami-0e9c33d03cf57fad6
      InstanceType: !Ref InstanceType
      KeyName: !Ref KeyName
      SecurityGroupIds:
      -
        !Ref SecurityGroup
      SubnetId: !Ref subnet
      Tags:
        - Key: Name
          Value: "TestVPN"
I run the create-stack again passing specific parameters for the KeyName, InstanceType, VPC CIDR and VPC Subnet to be used in the us-east-2 region.
$ aws cloudformation create-stack –stack-name SophosVPN –template-body file:///home/evan/sophos3.yaml –parameters ParameterKey=KeyName,ParameterValue=amazonohio ParameterKey=InstanceType,ParameterValue=t2.micro ParameterKey=VpcCIDR,ParameterValue=10.10.0.0/16 ParameterKey=SubnetCIDR,ParameterValue=10.10.2.0/24
{
    “StackId”: “arn:aws:cloudformation:us-east-2:179741345863:stack/SophosVPN/02f077c0-a49b-11e8-9441-0a849e1b5978”
}
I verify the stack is up
$ aws cloudformation describe-stacks –stack-name SophosVPN –region us-east-2
{
    “Stacks”: [
        {
            “StackId”: “arn:aws:cloudformation:us-east-2:179741345863:stack/SophosVPN/02f077c0-a49b-11e8-9441-0a849e1b5978”,
            “Description”: “CF Template to build VPN to Sophos UTM + test instance”,
            “Parameters”: [
                {
                    “ParameterValue”: “amazonohio”,
                    “ParameterKey”: “KeyName”
                },
                {
                    “ParameterValue”: “10.10.2.0/24”,
                    “ParameterKey”: “SubnetCIDR”
                },
                {
                    “ParameterValue”: “10.10.0.0/16”,
                    “ParameterKey”: “VpcCIDR”
                },
                {
                    “ParameterValue”: “t2.micro”,
                    “ParameterKey”: “InstanceType”
                }
            ],
            “Tags”: [],
            “EnableTerminationProtection”: false,
            “CreationTime”: “2018-08-20T17:03:51.111Z”,
            “StackName”: “SophosVPN”,
            “NotificationARNs”: [],
            “StackStatus”: “CREATE_COMPLETE”,
            “DisableRollback”: false,
            “RollbackConfiguration”: {}
        }
    ]
}
Re-initialize the Sophos UTM
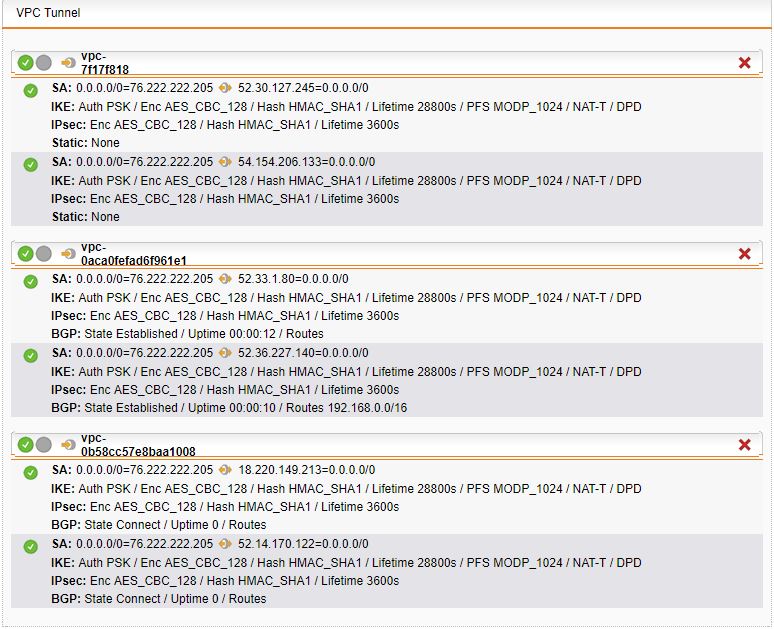
In order for the second VPN to come we will need to go back to our Sophos UTM -> Site-to-Site VPN -> Amazon VPC -> Setup. And import our credentials again to pull down the new VPN information. Then verify the new VPN connection comes up.
Test connectivity to the 2nd VPN
Now that the second stack is up and the UTM has been re-initialized with the second tunnels configuration. We can test connectivity to the second EC2 test instance. Again I will grab the instance-id of the new instance that was spun up in the us-east-2 region.
$ aws cloudformation describe-stack-events --stack-name SophosVPN --region us-east-2 | grep -A 5 AWS::EC2::Instance
            "ResourceType": "AWS::EC2::Instance",
            "Timestamp": "2018-08-20T17:04:49.157Z",
            "StackName": "SophosVPN",
            "ResourceProperties": "{\"KeyName\":\"amazonohio\",\"ImageId\":\"ami-0e9c33d03cf57fad6\",\"SubnetId\":\"subnet-0e30704710cfb6742\",\"InstanceType\":\"t2.micro\",\"SecurityGroupIds\":[\"sg-09b2170ba70be7223\"],\"Tags\":[{\"Value\":\"TestVPN\",\"Key\":\"Name\"}]}",
            "PhysicalResourceId": "i-0c5cc65d3db5e12dc",
            "LogicalResourceId": "TestInstance"
I get the PrivateIpAddress from the second test instance.
$ aws ec2 describe-instances –instance-ids i-0c5cc65d3db5e12dc | grep PrivateIpAddress
                    “PrivateIpAddress”: “10.10.2.67”,
                            “PrivateIpAddresses”: [
                                    “PrivateIpAddress”: “10.10.2.67”,
                            “PrivateIpAddress”: “10.10.2.67”,
I then verify I can ping that instance from my On-Prem machine and also test connectivity from AWS to On-Prem.
evan@pine64:~$ ping -c 3 10.10.2.67
PING 10.10.2.67 (10.10.2.67) 56(84) bytes of data.
64 bytes from 10.10.2.67: icmp_seq=1 ttl=253 time=67.2 ms
64 bytes from 10.10.2.67: icmp_seq=2 ttl=253 time=65.8 ms
64 bytes from 10.10.2.67: icmp_seq=3 ttl=253 time=64.8 ms

10.10.2.67 ping statistics
3 packets transmitted, 3 received, 0% packet loss, time 2002ms
rtt min/avg/max/mdev = 64.859⁄65.966⁄67.201⁄0.960 ms
[ec2-user@ip-10-10-2-67 ~]$ ping -c 3 172.16.2.23
PING 172.16.2.23 (172.16.2.23) 56(84) bytes of data.
64 bytes from 172.16.2.23: icmp_seq=1 ttl=63 time=63.4 ms
64 bytes from 172.16.2.23: icmp_seq=2 ttl=63 time=64.4 ms
64 bytes from 172.16.2.23: icmp_seq=3 ttl=63 time=64.7 ms

172.16.2.23 ping statistics
3 packets transmitted, 3 received, 0% packet loss, time 2002ms
rtt min/avg/max/mdev = 63.426⁄64.212⁄64.778⁄0.573 ms
Verify I can send traffic to both tunnels
Finally I want to make sure I can ping both test instances while both tunnels are up.
evan@pine64:~$ ping -c 3 192.168.2.147
PING 192.168.2.147 (192.168.2.147) 56(84) bytes of data.
64 bytes from 192.168.2.147: icmp_seq=1 ttl=253 time=78.8 ms
64 bytes from 192.168.2.147: icmp_seq=2 ttl=253 time=78.5 ms
64 bytes from 192.168.2.147: icmp_seq=3 ttl=253 time=77.5 ms

192.168.2.147 ping statistics
3 packets transmitted, 3 received, 0% packet loss, time 2002ms
rtt min/avg/max/mdev = 77.566⁄78.330⁄78.867⁄0.600 ms
[ec2-user@ip-192-168-2-147 ~]$ ping -c 3 172.16.2.23
PING 172.16.2.23 (172.16.2.23) 56(84) bytes of data.
64 bytes from 172.16.2.23: icmp_seq=1 ttl=63 time=78.8 ms
64 bytes from 172.16.2.23: icmp_seq=2 ttl=63 time=78.4 ms
64 bytes from 172.16.2.23: icmp_seq=3 ttl=63 time=78.6 ms

172.16.2.23 ping statistics
3 packets transmitted, 3 received, 0% packet loss, time 2003ms
rtt min/avg/max/mdev = 78.434⁄78.637⁄78.871⁄0.291 ms
evan@pine64:~$ ping -c 3 10.10.2.67
PING 10.10.2.67 (10.10.2.67) 56(84) bytes of data.
64 bytes from 10.10.2.67: icmp_seq=1 ttl=253 time=65.1 ms
64 bytes from 10.10.2.67: icmp_seq=2 ttl=253 time=66.2 ms
64 bytes from 10.10.2.67: icmp_seq=3 ttl=253 time=63.1 ms

10.10.2.67 ping statistics
3 packets transmitted, 3 received, 0% packet loss, time 2002ms
rtt min/avg/max/mdev = 63.143⁄64.834⁄66.239⁄1.313 ms
[ec2-user@ip-10-10-2-67 ~]$ ping -c 3 172.16.2.23
PING 172.16.2.23 (172.16.2.23) 56(84) bytes of data.
64 bytes from 172.16.2.23: icmp_seq=1 ttl=63 time=66.1 ms
64 bytes from 172.16.2.23: icmp_seq=2 ttl=63 time=64.4 ms
64 bytes from 172.16.2.23: icmp_seq=3 ttl=63 time=64.8 ms

172.16.2.23 ping statistics
3 packets transmitted, 3 received, 0% packet loss, time 2002ms
rtt min/avg/max/mdev = 64.418⁄65.109⁄66.102⁄0.777 ms
Now both tunnels are up and we can reach each test EC2 instance, and they can also reach back to the On-Prem machine. If we wanted to we could continue to spin up new tunnels from other regions as well using the CloudFormation template.